Showing posts with label solidworks macro tutorials. Show all posts

Saturday, 11 August 2018

More with UserForms Controls

In this article we will discuss following topics:

  • Changing properties for a UserForm control
  • Viewing the UserForm Code window
  • Showing the UserForm
  • Using information from a UserForm

Changing properties for a UserForm control

Every control you add to a UserForm has a number of properties that determine how the control looks or behaves. In addition, the UserForm itself also has its own set of properties. You can change these properties with the Properties window. Below figure shows the properties window when a CommandButton control is selected:
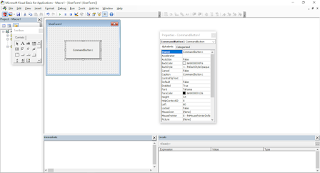
Use the Properties windows to change the properties of UserForm controls.

Properties for controls include the following:

  • Name
  • Width
  • Height
  • Value
  • Caption

Each control has its own set of properties (although many controls have some common properties). To change a property using the Properties window:

  1. Make sure that the correct control is selected in the UserForm.
  2. Make sure the Properties window is visible (press F4 if it’s not).
  3. In the Properties window, click on the property that you want to change.
  4. Make the change in the right portion of the Properties window.

If you select the UserForm itself (not a control on the UserForm), you can use the Properties window to adjust UserForm properties

Some of the UserForm properties serve as default settings for new controls you drag onto the UserForm. For example, if you change the Font property for a UserForm, controls that you add will use that same font. Controls that are already on the UserForm are not affected.


Viewing the UserForm Code window

Every UserForm object has a Code module that holds the VBA code (the event-handler procedures) executed when the user works with the dialog box. To view the Code module, press F7. The Code window is empty until you add some procedures. Press Shift+F7 to return to the dialog box.

Here’s another way to switch between the Code window and the UserForm display: Use the View Code and View Object buttons in the Project window’s title bar. Or right-click the UserForm and choose View Code. If you’re viewing code, double-click the UserForm name in the Project window to return to the UserForm.


Showing the UserForm

You display a UserForm by using the UserForm’s Show method in a VBA procedure.

The macro that displays the dialog box must be in a VBA module — not in the Code window for the UserForm.

The following procedure displays the dialog box named UserForm1:

VB: Showing the UserForm
Sub ShowDialogBox()
  UserForm.Show
  'Other statements can go here
End Sub

When Solidworks displays the dialog box, the ShowDialogBox macro halts until the user closes the dialog box. Then VBA executes any remaining statements in the procedure. Most of the time, you won’t have any more code in the procedure.


Using information from a UserForm

The VBE provides a name for each control you add to a UserForm. The control’s name corresponds to its Name property. Use this name to refer to a particular control in your code. For example, if you add a CheckBox control to a UserForm named UserForm1, the CheckBox control is named CheckBox1 by default. The following statement makes this control appear with a checkmark:

UserForm1.CheckBox1.Value = True

Most of the time, you write the code for a UserForm in the UserForm’s code module. If that’s the case, you can omit the UserForm object qualifier and write the statement like this:

CheckBox1.Value = True

I recommend that you change the default name the VBE has given to your controls to something more meaningful.

This will sum-up our tutorials on Visual Basic for Application. From now on I will give tutorials on how to use Solidworks commands with the help of VBA Macro.
If you want to know any explanation on any topic related to VBA, please drop a comment and I will try to give it to you. Thank you!!!!

Sunday, 8 July 2018

Working with UserForms

Each dialog box that you create is stored in its own UserForm object — one dialog box per UserForm. You create and access these UserForms in the Visual Basic Editor.

Inserting a new UserForm

To insert a UserForm object with the following steps:

  1. In the macro, you can insert User form with following 2 ways:

    • From “Menu Bar” ⇨ “UserForm”
    • From “Standard Toolbar” by clicking “Insert UserForm”
    • The VBE insert a new UserForm object with an empty dialog box.

  2. If “Property window” is not available in your macro, press F4 to display “Property window”.

The VBE inserts a new UserForm object, which contains an empty dialog box.

Below figure shows a UserForm — an empty dialog box with some controls in Toolbox.

A new userform object

Adding controls to a UserForm

When you activate a UserForm, the VBE displays the Toolbox in a floating window, as shown in the above figure. You use the tools in the Toolbox to add controls to your UserForm. If the Toolbox doesn’t appear when you activate your UserForm, choose View ⇨ Toolbox.

To add a control, just click the desired control in the Toolbox and drag it into the dialog box to create the control. After you add a control, you can move and resize it by using standard techniques.

Below table indicates the various tools, as well as their capabilities. To determine which tool is which, hover your mouse pointer over the control and read the small pop-up description.

ToolBox Control
Controls What it does
Label Shows text
TextBox Determines which of the file filters the dialog box displays by default.
ComboBox Display a drop-down list.
ListBox Display a list of items.
CheckBox Useful for On/off or Yes/No options.
OptionButton Used in groups; allows the user to select one of several options.
ToggleButoon A button that is either on or off.
Frame A container for other control.
CommandButton A clickable button.
TabStrip Display Tabs
MultiPage A tabbed container for other objects.
ScrollBar A draggable bar.
SpinButton A clickable button often used for changing a value.
Image Contains an image
RefEdit Allows the user to select a range.

Tuesday, 3 July 2018

UserForms Basics

A UserForm is useful if your VBA macro needs to get information from a user. For example, your macro may have some options that can be specified in a UserForm. If only a few pieces of information are required (for example, a Yes/No answer or a text string), one of the techniques I describe in previous articles may do the job. But if you need to obtain more information, you must create a UserForm.

To create a UserForm, you usually take the following general steps:

  1. Determine how the dialog box will be used and where it will be displayed in your VBA macro.
  2. Activate the VBE and insert a new UserForm object. A UserForm object holds a single UserForm.
  3. Add controls to the UserForm. Controls include items such as text boxes, buttons, check boxes, and list boxes.
  4. Use the Properties window to modify the properties for the controls or for the UserForm itself.
  5. Write event-handler procedures for the controls (for example, a macro that executes when the user clicks a button in the dialog box). These procedures are stored in the Code window for the UserForm object.
  6. Write a procedure (stored in a VBA module) that displays the dialog box to the user.

Don’t worry if some of these steps seem foreign. I provide more details in the following sections, along with step-by-step instructions for creating a UserForm.

When you are designing a UserForm, you are creating what developers call the Graphical User Interface (GUI) to your application. Take some time to consider what your form should look like and how your users are likely to want to interact with the elements on the UserForm. Try to guide them through the steps they need to take on the form by carefully considering the arrangement and wording of the controls. Like most things VBA-related, the more you do it, the easier it gets.

Friday, 22 June 2018

The InputBox Function

The VBA's InputBox function is useful for obtaining a single piece of information from the user. That information could be a value, a text string, or even a range address. This is a good alternative to developing a UserForm when you need to get only one value.

InputBox syntax

Here’s a simplified version of the syntax for the InputBox function:

VB: InputBox syntax
InputBox(prompt[, title][, default])

The InputBox function accepts the arguments listed in below table.

InputBox Function Arguments
Arguments What it means
prompt The text displayed in the input box.
Title The text displayed in the input box’s title bar (optional).
Default The default value for the user’s input (optional)

An InputBox example

Here’s an example showing how you can use the InputBox function:

VB: InputBox example
TheName = InputBox(“What is your name?”, “Greetings”)

When you execute this VBA statement, the application displays the dialog box shown in below figure. Notice that this example uses only the first two arguments and does not supply a default value. When the user enters a value and clicks OK, the routine assigns the value to the variable TheName.

InputBox dialog box

Please note that VBA’s InputBox function always returns a string, so if you need to get a value, your code will need to do some additional checking. The following example uses the InputBox function to get a number. It uses the IsNumeric function to check whether the string is a number. If the string does contain a number, all is fine. If the user’s entry cannot be interpreted as a number, the code displays a message box.

VB: InputBox example
Sub GetDrawingSheetNumber()
  DDim NumberOfSheets as Stringg
  Prompt = “How many sheets drawing have?”
  NumberOfSheets = InputBox (Prompt)

  If NumberOfSheets = “” Then Exit Sub
  If (IsNumeric)NumberOfSheets Then
    '......[Some code here]....
    Else
    MsgBox “Please enter a number.”
  End If
End Sub

Friday, 15 June 2018

Dialog Boxes

You can’t use VBA very long without being exposed to dialog boxes. They seem to pop up almost every time you select a command. VBA uses dialog boxes to obtain information, clarify commands, and display messages. If you develop VBA macros, you can create your own dialog boxes that work just like those built in. Those custom dialog boxes are called UserForms in VBA. About which we look into next section.

UserForm Alternatives

Some of the VBA macros you create behave the same every time you execute them. For example, you may develop a macro for intermediate steps you do every day. This macro always produces the same result and requires no additional user input.

You might develop other macros that behave differently under various circumstances or that offer the user options. In such cases, the macro may benefit from a custom dialog box. A custom dialog box provides a simple means for getting information from the user. Your macro then uses that information to determine what it should do.

UserForms can be quite useful, but creating them takes time. Before I cover the topic of creating UserForms in the next section, you need to know about some potentially timesaving alternatives.

VBA lets you display several different types of dialog boxes that you can sometimes use in place of a UserForm. You can customize these built-in dialog boxes in some ways, but they certainly don’t offer the options available in a UserForm. In some cases, however, they’re just what you need.

In the following sections you read about

  • The MsgBox function
  • The InputBox function
  • The GetOpenFilename method
  • The GetSaveAsFilename method
  • The FileDialog method

Saturday, 9 June 2018

Bug Reduction Tips

I can’t tell you how to completely eliminate bugs in your programs. Finding bugs in software can be a profession by itself, but I can provide a few tips to help you keep those bugs to a minimum:

  • Use an Option Explicit statement at the beginning of your modules. This statement requires you to define the data type for every variable you use. This creates a bit more work for you, but you avoid the common error of misspelling a variable name. And it has a nice side benefit: Your routines run a bit faster.
  • Format your code with indentation. Using indentations helps delineate different code segments. If your program has several nested For-Next loops, for example, consistent indentation helps you keep track of them all.
  • Use lots of comments. Nothing is more frustrating than revisiting code you wrote six months ago and not having a clue as to how it works. By adding a few comments to describe your logic, you can save lots of time down the road.
  • Keep your Sub and Function procedures simple. By writing your code in small modules, each of which has a single, well-defined purpose, you simplify the debugging process.
  • Use the macro recorder to help identify properties and methods. When I can’t remember the name or the syntax of a property or method, I often simply record a macro and look at the recorded code

Debugging code is not one of my favorite activities, but it’s a necessary evil that goes along with programming. As you gain more experience with VBA, you spend less time debugging and, when you have to debug, are more efficient at doing so.

Wednesday, 6 June 2018

About the Debugger

In this section, I discuss the details of using the VBA debugging tools. These tools are much more powerful than the techniques I discuss in the previous section. But along with power comes responsibility. Using the debugging tools takes a bit of setup work.

Setting breakpoints in your code

In earlier sections, I discuss using MsgBox functions in your code to monitor the values of certain variables. Displaying a message box essentially halts your code in mid-execution, and clicking the OK button resumes execution.

Wouldn’t it be nice if you could halt a routine’s execution, take a look at the value of any of your variables, and then continue execution? Well, that’s exactly what you can do by setting a breakpoint. You can set a breakpoint in your VBA code in several ways:

  • Move the cursor to the statement at which you want execution to stop; then press F9.
  • Click in the gray margin to the left of the statement at which you want execution to stop. This is I used mainly.
  • Position the insertion point in the statement at which you want execution to stop. Then use the Debug ⇨ Toggle Breakpoint command.
  • Right-click a statement and choose Toggle ⇨ Breakpoint from the shortcut menu.

The results of setting a breakpoint are shown in below figure. VBE highlights the line to remind you that you set a breakpoint there; it also inserts a large dot in the gray margin.

Breakpoint in procedure

When you execute the procedure, VBE goes into Break mode before the line with the breakpoint is executed. In Break mode, the word [break] is displayed in the VBE title bar. To get out of Break mode and continue execution, press F5 or click the Run Sub/UserForm button in the VBE toolbar.

To quickly remove a breakpoint, click the large dot in the gray margin or move the cursor to the highlighted line and press F9. To remove all breakpoints in the module, press Ctrl+Shift+F9.

What is Break mode? You can think of it as a state of suspended animation. Your VBA code stops running and the current statement is highlighted in bright yellow. In Break mode, you can

  • Type VBA statements in the Immediate window.
  • Press F8 to step through your code one line at a time to check various things while the program is paused.
  • Move the mouse pointer over a variable to display its value in a small pop-up window.
  • Skip the next statement(s) and continue execution there (or even go back a couple of statements).
  • Edit a statement and then continue.

Below figure shows some debugging action. A breakpoint is set (notice the big dot), and I’m using the F8 key to step through the code line by line (notice the arrow that points to the current statement). I used the Immediate window to print “Hello world”.

Break mode

Using the Immediate window

The Immediate window may not be visible in the VBE. You can display the VBE’s Immediate window at any time by pressing Ctrl+G.

In Break mode, the Immediate window is particularly useful for finding the current value of any variable in your program. For example, if you want to know the current value of a variable, enter the following in the Immediate window and press Enter.

The Immediate window lets you do other things besides check variable values. For example, you can change the value of a variable, try for a new condition. Just make sure that the command you enter is a valid VBA statement.


Stepping through your code

While in Break mode, you can also step through your code line by line. One statement is executed each time you press F8 Throughout this line-by-line execution of your code, you can activate the Immediate window at any time to check the status of your variables.

You can use your mouse to change which statement VBA will execute next. If you put your mouse pointer in the gray margin to the left of the currently highlighted statement (which will usually be yellow), your pointer changes to a right-pointing arrow. Simply drag your mouse to the statement you want to be done next and watch that statement turn yellow.


Using the Watch window

In some cases, you may want to know whether a certain variable or expression takes on a particular value. For example, suppose that a procedure loops through 1,000 times. You notice that a problem occurs during the 800th iteration of the loop. Well, you could insert a breakpoint in the loop, but that would mean responding to 799 prompts before the code finally get to the iteration you want to see (and that gets boring real fast). A more efficient solution involves setting a watch expression.

For example, you can create a watch expression that puts the procedure into Break mode whenever a certain variable takes on a specific value — for example, AnyNumber=800. To create a watch expression, choose Debug ⇨ Add Watch to display the Add Watch dialog box. See below figure.

Watch window dialog box

The Add Watch dialog has three parts:

  • Expression: Enter a valid VBA expression or a variable here. For example, AnyNumber=900 or just AnyNumber.
  • Context: Select the procedure and the module you want to watch. Note that you can select All Procedures and All Modules.
  • Watch Type: Select the type of watch by clicking an option button. Your choice here depends on the expression you enter. The first choice, Watch Expression, does not cause a break; it simply displays the expression’s value when a break occurs.

Execute your procedure after setting up your watch expression(s). Things run normally until your watch expression is satisfied (based on the Watch Type you specified). When that happens, VBE enters Break mode (you did set the Watch Type to “Break When Value Is True,” didn’t you?). From there, you can step through the code or use the Immediate window to debug your code.

When you create a watch, VBE displays the Watches window shown in below figure. This window displays the value of all watches that you’ve defined. In this figure, when the value hit 800, which caused VBE to enter Break mode.

Watch window dialog box with all watches

The best way to understand how these Watch business works are to use it and try various options. Before long, you’ll probably wonder how you ever got along without it.


Using the Locals window

Another useful debugging aid is the Locals window. You can show this window by choosing View ⇨ Locals Window from the VBE’s menu. When you are in Break mode, this window will show you a list of all variables that are local to the current procedure (see below figure). The nice thing about this window is that you don’t have to add a load of watches manually if you want to look at the content of many variables. The VBE has done all the hard work for you.

Local window

Saturday, 2 June 2018

Bug Finding and Debugging Techniques

Bug Finding

A bug is an error in your programming. Here I cover the topic of programming bugs — how to identify them and how to remove them from your module.

Types of Bugs

The term program bug, as you probably know, refers to a problem with software. In other words, if the software doesn’t perform as expected, it has a bug. Fact is, all major software programs have bugs — lots of bugs. A CAD software like SOLIDWORKS itself has hundreds (if not thousands) of bugs. Fortunately, the vast majority of these bugs are relatively obscure and appear in only very specific circumstances.

When you write non-trivial VBA programs, your code probably will have bugs. This is a fact of life and not necessarily a reflection of your programming ability. The bugs may fall into any of the following categories:

  • Logical flaws in your code: You can often avoid these bugs by carefully thinking through the problem your program addresses.
  • Incorrect context bugs: This type of bug surfaces when you attempt to do something at the wrong time. For example, you may try to update the sketch dimension and there are no sketch is activated.
  • Extreme-case bugs: These bugs rear their heads when you encounter data you didn’t anticipate, such as very large or very small numbers.
  • Wrong data types bugs: This type of bug occurs when you try to process data of the wrong type, such as attempting to take the square root of a text string.

Debugging is the process of identifying and correcting bugs in your program. Developing debugging skills takes time, so don’t be discouraged if this process is difficult at first.

It’s important to understand the distinction between bugs and syntax errors. A syntax error is a language error. For example, you might misspell a keyword, omit the Next statement in a For-Next loop, or have a mismatched parenthesis. Before you can even execute the procedure, you must correct these syntax errors. A program bug is much subtler. You can execute the routine, but it doesn’t perform as expected.


Identifying Bugs

Before you can do any debugging, you must determine whether a bug actually exists. You can tell that your macro contains a bug if it doesn’t work the way it should. Usually, but not always, you can easily discern this.

A key fact known to all programmers is that bugs often appear when you least expect them. For example, just because your macro works fine with one data set doesn’t mean you can assume it will work equally as well with all data sets. Or your macro runs fine in your system but not working properly in your friend's system. Such cases happened all the time and are part of debugging.

The best debugging approach is to start with thorough testing, under a variety of real-life conditions. And because any changes made by your VBA code cannot be undone, it is always a good idea to use a backup copy of your CAD files that you use for testing. I usually copy some files into a temporary folder and use those files for my testing.


Debugging Techniques

In this section, I discuss the some of the most common methods for debugging VBA code:

  • Examine your code
  • Inserting MsgBox functions at various locations in your code
  • Inserting Debug.Print statement

Examine your code

Perhaps the most straightforward debugging technique is simply taking a close look at your code to see whether you can find the problem. If you’re lucky, the error jumps right out, and you can fix the problem.

Notice I said, “If you’re lucky.” That’s because often you discover errors when you have been working on your program for long hours and you are running on caffeine and willpower. At times like that, you are lucky if you can even see your code. Thus, don’t be surprised if simply examining your code isn’t enough to make you find and expunge all the bugs it contains.


Using the MsgBox function

A common problem in many programs involves one or more variables not taking on the values you expect. In such cases, monitoring the variable(s) while your code runs is a helpful debugging technique. One way to do this is by inserting temporary MsgBox functions into your routine. For example, I used MsgBox function to check conditions. Whenever I use If-Else statement, I put one message in If condition and put another message in Else condition. By this way, I make sure condition which I want is working correctly or not.

Feel free to use MsgBox functions frequently when you debug your code. Just make sure that you remove them after you identify and correct the problem.


Inserting Debug.Print Statement

As an alternative to using MsgBox functions in your code, you can insert one or more temporary Debug.Print statements. Use these statements to print the value of one or more variables in the Immediate window. Here’s an example that displays a message of "This condition is working fine".

VB: Debug.Print Statement
If swPart Is Nothing Then
  Debug.Print “This condition is working fine.”

If VBE’s Immediate window is not visible, press Ctrl+G.

Unlike MsgBox, Debug.Print statements do not halt your code. So you’ll need to keep an eye on the Immediate window to see what’s going on. After you’ve debugged your code, be sure to remove all the Debug.Print statements.

Sunday, 20 May 2018

Do-While Loop, Do-Until Loop & Looping through a Collection

Do-While Loop

VBA supports another type of looping structure known as a Do-While loop. Unlike a For-Next loop, a Do-While loop continues until a specified condition is met. Here’s the Do-While loop syntax:

VB: Do-While Structure
Do [While condition]
  [statements]
  [Exit Do]
  [statements]
Loop

The following example uses a Do-While loop. This routine uses 1 as a starting point and runs through next numbers. The loop continues until the routine encounter the condition of i = 8.

VB: Do-While Example
Sub ShowNumbers4()
  Dim i As Integer
  Do While i <> 8
    MsgBox i
    i = i + 1
  Loop
End Sub

Some people prefer to code a Do-While loop as a Do-Loop While loop. This example performs exactly as the previous procedure but uses different loop syntax:

VB: Do-Loop While Example
Sub ShowNumbers5()
  Dim i As Integer
  Do
    MsgBox i
    i = i + 1
  Loop While i <> 8
End Sub

Here’s the key difference between the Do-While and Do-Loop While loops: The Do-While loop always performs its conditional test first. If the test is not true, the instructions inside the loop are never executed. The Do-Loop While loop, on the other hand, always performs its conditional test after the instructions inside the loop are executed. Thus, the loop instructions are always executed at least once, regardless of the test. This difference can sometimes have a big effect on how your program functions.


Do-Until Loop

The Do-Until loop structure is similar to the Do-While structure. The two structures differ in their handling of the tested condition. A program continues to execute a Do-While loop while the condition remains true. In a Do-Until loop, the program executes the loop until the condition is true. Here’s the Do-Until syntax:

VB: Do-Until Structure
Do [Until condition]
  [statements]
  [Exit Do]
  [statements]
Loop

The following example is the same one presented for the Do-While loop but recoded to use a Do-Until loop:

VB: Do-Until Example
Sub ShowNumbers6()
  Dim i As Integer
  Do Until i <> 8
    MsgBox i
    i = i + 1
  Loop
End Sub

Just like with the Do-While loop, you may encounter a different form of the Do-Until loop — a Do-Loop Until loop. The following example, which has the same effect as the preceding procedure, demonstrates an alternate syntax for this type of loop:

VB: Do-Loop Until Example
Sub ShowNumbers7()
  Dim i As Integer
  Do
    MsgBox i
    i = i + 1
  Loop Until i <> 8
End Sub

There is a subtle difference in how the Do-Until loop and the Do-Loop Until loop operate. In the former, the test is performed at the beginning of the loop, before anything in the body of the loop is executed. This means that it is possible that the code in the loop body will not be executed if the test condition is met. In the latter version, the condition is tested at the end of the loop. Therefore, at a minimum, the Do-Loop Until loop always results in the body of the loop being executed once.

Another way to think about it is like this: The Do-While loop keeps looping as long as the condition is true. The Do-Until loop keeps looping as long as the condition is False.


Looping through a Collection

VBA supports yet another type of looping — looping through each object in a collection of objects. Please note that I have not covered Object topic so far. For your understanding I give a brief explanation about collection.

A collection is a group of same type of objects. For example, a drawing file in any CAD application is a collection of Sheets, and each sheet is a collection of drawing views and so on.

When you need to loop through each object in a collection, use the For Each-Next structure. The syntax is

VB: For Each-Next Structure
For Each element In collection
  [statements]
  [Exit For]
  [statements]
Next [element]

The following example loops through each drawing sheet in the active drawing and shows name of each active drawing sheet:

VB: For Each-Next Example
Option Explicit
Dim swApp As SldWorks.SldWorks
Dim swPart As SldWorks.ModelDoc2
Dim swDwg As SldWorks.DrawingDoc
Dim BoolStatus As Boolean
Dim SheetNamesList As Variant
Sub ShowSheetName()
  Set swApp = Application.SldWorks
  Set swPart = swApp.ActiveDoc
  Set swDwg = swPart
  SheetNamesList = swDwg.GetSheetNames
  Dim SheetName As Variant
  For Each SheetName In SheetNamesList
    MsgBox SheetName
  Next SheetName
End Sub

In this example, first we get the list of all sheet names in the opened drawing, then we loop through each sheet name in the collection and show sheet name in a message box. For this example please notes that we did not need to load all sheet, this code can work on non-activate and non-loaded sheets also.

Thursday, 10 May 2018

Looping of your Code

The term looping refers to repeating a block of VBA statements numerous times. VBA provides various looping command for repeating code to make correct decision making. We will go through them in following topics:

For -Next Loop

The simplest type of loop is a For-Next loop. Here’s the syntax for this structure:

Structure

  For counter = start To end [Step stepval]
    [statements]
    [Exit For]
    [statements]
  Next [counter]

The looping is controlled by a counter variable, which starts at one value and stops at another value. The statements between the For statement and the Next statement are the statements that get repeated in the loop. To see how this works, keep reading.

For-Next example

The following example shows a For-Next loop that doesn’t use the optional Step value or the optional Exit For statement. This routine loops 10 times and uses the VBA MsgBox function to show a number from 1 to 10:

Example

Sub ShowNumbers1()
  Dim i As Integer
  For i = 1 to 10
    MsgBox i
  Next i
End Sub

In this example, I (the loop counter variable) starts with a value of 1 and increases by 1 each time through the loop. Because I didn’t specify a Step value the MsgBox method uses the value of I as an argument. The first time through the loop, i is 1 and the procedure shows a number. The second time through (i = 2), the procedure shows a number, and so on.


For-Next example with a step

You can use a Step value to skip some values in a For-Next loop. Here’s the same procedure as in the preceding section, rewritten to insert random numbers

Example

Sub ShowNumbers2()
  Dim i As Integer Step 2
  For i = 1 to 10
    MsgBox i
  Next i
End Sub

The count starts out as 1 and then takes on a value of 3, 5, 7, and 9. The final Count value is 9. The Step value determines how the counter is incremented. Notice that the upper loop value (9) is not used because the highest value of Count after 9 would be 11, and 11 is larger than 10.


For-Next example with an Exit For statement

A For-Next loop can also include one or more Exit For statements within the loop. When VBA encounters this statement, the loop terminates immediately. Here’s the same procedure as in the preceding section, rewritten to insert random numbers.

Example

Sub ShowNumbers3()
  Dim i As Integer Step 2
  For i = 1 to 10
    If i = 5 Then
      MsgBox “This is a mid value”
      Exit For
    End If
    MsgBox i
  Next i
End Sub

This routine performs the as earlier but when the variable I reached to 5, it shows a message, stating that this is a mid value and exit from the loop.

Saturday, 5 May 2018

Select Case structure

The Select Case structure is useful for decisions involving three or more options (although it also works with two options, but using If-Then-Else structure is more efficient for that).

The syntax for the Select Case structure follows:

Example

  Select Case testexpression
  [Case expressionlist-n
    [statements-n]]
  [Case Else
    [elsestatements]]
  End Select

Don’t be scared off by this official syntax. Using the Select Case structure is quite easy.


Select Case example

The following example shows how to use the Select Case structure. This also shows another way to code the examples presented in the previous section:

Example

Sub SelectPartLength()
  Dim PartNumber As Integer
  Dim PartLength As Integer
  PartNumber = InputBox(“Please Enter part number:”)
  Select Case PartNumber
    Case Part001
      PartLength = 1
    Case Part002
      PartLength = 2
    Case Part003
      PartLength = 3
  End Select
  MsgBox “Part Length for this” & PartNumber & “is” & PartLength
End Sub

In this example, the PartNumber variable is being evaluated. The routine is checking for three different cases.

If-Then-Else structure

If-Then is VBA’s most important control structure. You’ll probably use this command on a daily basis. As in many other aspects of life, effective decision-making is the key to success in writing CAD or any other macros.

The If-Then structure has this basic syntax:

Example

  If condition Then statements [Else elsestatements]

Use the If-Then structure when you want to execute one or more statements conditionally. The optional Else clause, if included, lets you execute one or more statements if the condition you’re testing is not true. Sound confusing? Don’t worry; a few examples make this crystal clear.

If-Then examples

The following routine demonstrates the If-Then structure without the optional Else clause:

Example

Sub GoodMorning()
  If Time < 0.5 Then MsgBox “Good Morning.”
End Sub

The GoodMorning procedure uses VBA’s Time function to get the system time. If the current system time is less than .5 (in other words, before noon), the routine displays a friendly greeting. If Time is greater than or equal to .5, the routine ends and nothing happens.

To display a different greeting if Time is greater than or equal to 0.5, add another If-Then statement after the first one:

Example

Sub GoodMorning2()
  If Time < 0.5 Then MsgBox “Good Morning.”
  If Time >= 0.5 Then MsgBox “Good Afternoon.”
End Sub

Notice that I used >= (greater than or equal to) for the second If-Then statement. This ensures that the entire day is covered. Had I used > (greater than), then no message would appear if this procedure were executed at precisely 12:00 noon.

If-Then-Else examples

Another approach to the preceding problem uses the Else clause. Here’s the same routine recoded to use the If-Then-Else structure:

Example

Sub GoodMorning3()
  If Time < 0.5 Then MsgBox “Good Morning.” Else _
  MsgBox “Good Afternoon.”
End Sub

Notice that I use the line continuation character (underscore) in the preceding example. The If-Then-Else statement is actually a single statement. VBA provides a slightly different way of coding If-Then-Else constructs that use an End-If statement. Therefore, the GoodMorning procedure can be rewritten as:

Example

Sub GoodMorning4()
  If Time < 0.5 Then
    MsgBox “Good Morning.”
  Else
    MsgBox “Good Afternoon.”
  End If
End Sub

In fact, you can insert any number of statements under the If part, and any number of statements under the Else part. I prefer to use this syntax because it’s easier to read and makes the statements shorter.

What if you need to expand the GoodMorning routine to handle three conditions: morning, afternoon, and evening? You have two options: Use three If-Then statements or use a nested If-Then-Else structure. Nesting means placing an If-Then-Else structure within another If-Then-Else structure. The first approach, the three statements, is simplest:

Example

Sub GoodMorning5()
  If Time < 0.5 Then Msg = “Morning.”
  If Time >= 0.5 And Time < 0.75 Then Msg = “Afternoon.”
  If Time >= 0.75 Then Msg = “Evening.”
  MsgBox “Good” & Msg
End Sub

The Msg variable gets a different text value, depending on the time of day. The final MsgBox statement displays the greeting: Good Morning, Good Afternoon, or Good Evening.

The following routine performs the same action but uses an If-Then-End If structure:

Example

Sub GoodMorning6()
  Dim Msg As String
  If Time < 0.5 Then
    Msg = “Morning.”
  If Time >= 0.5 And Time < 0.75 Then
    Msg = “Afternoon.”
  If Time >= 0.75 Then
    Msg = “Evening.”
  End If
  MsgBox “Good” & Msg
End Sub

If-ElseIf-Else examples

In the previous examples, every statement in the routine is executed — even in the morning. A more efficient structure would exit the routine as soon as a condition is found to be true. In the morning, for example, the procedure should display the Good Morning message and then exit — without evaluating the other superfluous conditions.

With a tiny routine like this, you don’t have to worry about execution speed. But for larger applications in which speed is important, you should know about another syntax for the If-Then structure. The ElseIf syntax follows:

Example

  If condition Then
    [statements]
  [Else condition-n Then
    [elseifstatements]]
  [Else
    [elsestatements]]

Here’s how you can rewrite the GreetMe routine by using this syntax:

Example

Sub GoodMorning7()
  Dim Msg As String
  If Time < 0.5 Then
    Msg = “Morning.”
  ElseIf Time >= 0.5 And Time < 0.75 Then
    Msg = “Afternoon.”
  Else
    Msg = “Evening.”
  End If
  MsgBox “Good” & Msg
End Sub

When a condition is true, VBA executes the conditional statements and the If structure ends. In other words, VBA doesn’t waste time evaluating the extraneous conditions, which makes this procedure a bit more efficient than the previous examples. The trade-off (there are always trade-offs) is that the code is more difficult to understand. (Of course, you already knew that.)

Thursday, 3 May 2018

Controlling Program Flow and Making Decisions

Some VBA procedures start at the code’s beginning and progress line by line to the end, never deviating from this top-to-bottom program flow. Macros that you record always work like this. In many cases, however, you need to control the flow of your code by skipping over some statements, executing some statements multiple times, and testing conditions to determine what the procedure does next.

Some programming newbies can’t understand how a dumb computer can make intelligent decisions. The secret is in several programming constructs that most programming languages support. Following table provides a quick summary of these constructs.

Programming Constructs for Making Decisions
Construct How it works
GoTo statement Jumps to a particular statement.
If-Then structure Does something if something else is true.
Select Case Does any of several things, depending on something’s value.
For-Next loop Executes a series of statements a specified number of times.
Do-While loop Does something as long as something else remains true.
Do-Until loop Does something until something else becomes true.

VBA Functions that do more

A few VBA functions go above and beyond the call of duty. Rather than simply return a value, these functions have some useful side effects. Below table lists them.

Functions with Useful Side Benefits
Function What is does
MsgBox Displays a handy dialog box containing a message and buttons. The function returns a code that identifies which button the user clicks.
InputBox Displays a simple dialog box that asks the user for some input. The function returns whatever the user enters into the dialog box.
Shell Executes another program. The function returns the task ID (a unique identifier) of the other program (or an error if the function can’t start the other program).
GetObject/CreateObject Returns/Create a reference to an object provided by an ActiveX component. (If you don't understand, don't bother about it. Just remember we use this function to for checking & creating objects in later topics)

Discovering VBA functions

How do we find out which function does VBA provides? The best source is the Visual Basic Help system in build in your CAD Application. I compiled a partial list of functions, which I share with you in the following Table. I omitted some of the more specialized or obscure functions.

For complete details on a particular function, type the function name into a VBA module, move the cursor anywhere in the text, and press F1.

VBA’s Most Useful Built-In Functions
Function What is does
Abs Returns a number’s absolute value.
Array Returns a variant containing an array.
Asc Converts the first character of a string to its ASCII value.
Atn Returns the arctangent of a number.
Choose Returns a value from a list of items.
Chr Converts an ANSI value to a string.
Cos Returns a number’s cosine.
CurDir Returns the current path.
Date Returns the current system date.
DateAdd Returns a date to which a specified time interval has been added — for example, one month from a particular date.
DatePart Returns an integer containing the specified part of a given date — for example, a date’s day of the year.
DateSerial Converts a date to a serial number.
DateValue Converts a string to a date.
Day Returns the day of the month from a date value.
Dir Returns the name of a file or directory that matches a pattern.
Erl Returns the line number that caused an error.
Err Returns the error number of an error condition.
Error Returns the error message that corresponds to an error number.
Exp Returns the base of the natural logarithm (e) raised to a power.
FileLen Returns the number of bytes in a file.
Fix Returns a number’s integer portion.
Format Displays an expression in a particular format.
GetSetting Returns a value from the Windows registry.
Hex Converts from decimal to hexadecimal.
Hour Returns the hours portion of a time.
InputBox Displays a box to prompt a user for input.
InStr Returns the position of a string within another string.
Int Returns the integer portion of a number.
IPmt Returns the interest payment for an annuity or loan.
IsArray Returns True if a variable is an array.
IsDate Returns True if an expression is a date.
IsEmpty Returns True if a variable has not been initialized.
IsError Returns True if an expression is an error value.
IsMissing Returns True if an optional argument was not passed to a procedure.
IsNull Returns True if an expression contains no valid data.
IsNumeric Returns True if an expression can be evaluated as a number.
IsObject Returns True if an expression references an OLE Automation object.
LBound Returns the smallest subscript for a dimension of an array.
LCase Returns a string converted to lowercase.
Left Returns a specified number of characters from the left of a string.
Len Returns the number of characters in a string.
Log Returns the natural logarithm of a number to base.
LTrim Returns a copy of a string, with any leading spaces removed.
Mid Returns a specified number of characters from a string.
Minutes Returns the minutes portion of a time value.
Month Returns the month from a date value.
MsgBox Displays a message box and (optionally) returns a value.
Now Returns the current system date and time.
RGB Returns a numeric RGB value representing a color.
Replace Replaces a substring in a string with another substring.
Right Returns a specified number of characters from the right of a string.
Rnd Returns a random number between 0 and 1.
RTrim Returns a copy of a string, with any trailing spaces removed.
Second Returns the seconds portion of a time value.
Sgn Returns an integer that indicates a number’s sign.
Shell Runs an executable program.
Sin Returns a number’s sine.
Space Returns a string with a specified number of spaces.
Split Splits a string into parts, using a delimiting character.
Sqr Returns a number’s square root.
Str Returns a string representation of a number.
StrComp Returns a value indicating the result of a string comparison.
String Returns a repeating character or string.
Tan Returns a number’s tangent.
Time Returns the current system time.
Timer Returns the number of seconds since midnight.
TimeSerial Returns the time for a specified hour, minute, and second.
TimeValue Converts a string to a time serial number.
Trim Returns a string without leading or trailing spaces.
TypeName Returns a string that describes a variable’s data type.
UBound Returns the largest available subscript for an array’s dimension.
UCase Converts a string to uppercase.
Val Returns the numbers contained in a string.
VarType Returns a value indicating a variable’s subtype.
Weekday Returns a number representing a day of the week.
Year Returns the year from a date value.

Wednesday, 2 May 2018

VBA Functions

A function essentially performs a calculation and returns a single value. The SUM function in MS Excel returns the sum of a range of values. The same holds true for functions used in your VBA expressions: Each function does its thing and returns a single value.

The functions you use in VBA can come from two sources:

  • Built-in functions provided by VBA
  • Custom functions that you (or someone else) write, using VBA (this one is more useful in MS Excel not in CAD application).

Built-In VBA Functions

VBA provides numerous built-in functions. Some of these functions take arguments and some do not.

I present a few examples of VBA functions in code. In many of these examples, I use the MsgBox function to display a value in a message box. Yes, MsgBox is a VBA function — a rather unusual one, but a function nonetheless. This useful function displays a message in a pop-up dialog box.


Displaying the system date or time

The first example uses VBA’s Date function to display the current system date in a message box:

Example

Sub ShowDate()
  MsgBox Date
End Sub

Notice that the Date function doesn’t use an argument. A VBA function with no argument doesn’t require an empty set of parentheses. In fact, if you type an empty set of parentheses, the VBE will promptly remove them.

To get the system time, use the Time function. And if you want it all, use the Now function to return both the date and the time.


Finding a string length

The following procedure uses the VBA's Len function, which returns the length of a text string. The Len function takes one argument: the string. When you execute this procedure, the message box displays 11 because the argument has 11 characters.

Example

Sub StringLength()
  Dim MyString As String
  Dim StringLength As Integer
  MyString = “Hello World”
  StringLength = Len(MyString)
  MsgBox StringLength
End Sub

Displaying the integer part of a number

The following procedure uses the Fix function, which returns the integer portion of a value — the value without any decimal digits:

Example

Sub GetIntegerPart()
  Dim MyValue As Double
  Dim IntValue As Integer
  MyValue = 123.456
  IntValue = Fix(MyValue)
  MsgBox IntValue
End Sub

In this case, the message box displays 123.

VBA has a similar function called Int Function. The difference between Int and Fix is how each deals with negative numbers. It’s a subtle difference, but sometimes it’s important.

  • Int Function returns the first negative integer that’s less than or equal to the argument. Int(-123.456) returns -124.
  • Fix Function returns the first negative integer that’s greater than or equal to the argument. Fix(-123.456) returns -123.

Determining a file size

The following Sub procedure displays the size, in bytes, of the executable file. It finds this value by using the FileLen function.

Example

Sub GetFileSize()
  Dim TheFile As String
  TheFile “C:\ProgramFiles\Program File\SolidworksCorp\SLDWORKS.exe”
  MsgBox FileLen(TheFile)
End Sub

Notice that this routine hard codes the filename (that is, it explicitly states the path). Generally, this isn’t a good idea. The file might not be on the C drive, or the Program File folder may have a different location. The following statement shows a better approach:

Example

TheFile = Application.Path & “\SLDWORKS.EXE”

A path is a property of the Application object. It simply returns the name of the folder in which the application (that is, SOLIDWORKS) is installed (without a trailing backslash).


Identifying the type of a selected object

The following procedure uses the TypeName function, which returns the type of the selection (as a string):

Example

Sub ShowSelectionType()
  Dim SelType As String
  SelType = TypeName(Selection)
  MsgBox SelType
End Sub

This could be a Sketch, a Part, an Assembly or any other type of object that can be selected.

The TypeName function is very versatile. You can also use this function to determine the data type of a variable.