Monday 21 January 2019

A new blog for CAD software programming

First of all, a BIG thank you for everyone who visits this blog. It shows me that the effort I put in this blog is not wasted.

In the beginning, I thought this website did not have visitors.

But in 6 months, this blog has visitors from all over the world which really surprise me!!!

I had written VBA tutorials and want to write more Solidworks macro tutorials in this blog.

But after writing VBA tutorials I found it is a very tedious process for me to write in this blog because of few listed reasons:
  • I am not a professional web developer, so it is difficult for me to those example code as they were in VBA Editor. They are a bunch of HTML code which I need to copy every time and try to present you in such a way that they look like VBA code.
  • I am not a professional blogger, so this process of writing HTML code is very tedious for me and it discourages me for writing more posts.
However to solve this problem I was constantly looking for a better blogging solution which can fit my problems.

After finding the solution I migrate all of my content to a new blog named "The CAD Coder". This new blog is personal in nature where I can as a person help you more.

This new blog will be having new content like tutorials on Solidworks VBA macros and on other CAD packages also.

So, please go to my new blog for more updated content.

See you guys at  The CAD Coder.

Thanks

Saturday 11 August 2018

More with UserForms Controls

In this article we will discuss following topics:

  • Changing properties for a UserForm control
  • Viewing the UserForm Code window
  • Showing the UserForm
  • Using information from a UserForm

Changing properties for a UserForm control

Every control you add to a UserForm has a number of properties that determine how the control looks or behaves. In addition, the UserForm itself also has its own set of properties. You can change these properties with the Properties window. Below figure shows the properties window when a CommandButton control is selected:
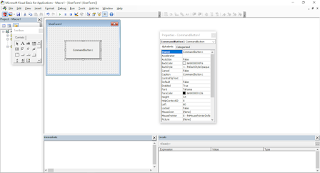
Use the Properties windows to change the properties of UserForm controls.

Properties for controls include the following:

  • Name
  • Width
  • Height
  • Value
  • Caption

Each control has its own set of properties (although many controls have some common properties). To change a property using the Properties window:

  1. Make sure that the correct control is selected in the UserForm.
  2. Make sure the Properties window is visible (press F4 if it’s not).
  3. In the Properties window, click on the property that you want to change.
  4. Make the change in the right portion of the Properties window.

If you select the UserForm itself (not a control on the UserForm), you can use the Properties window to adjust UserForm properties

Some of the UserForm properties serve as default settings for new controls you drag onto the UserForm. For example, if you change the Font property for a UserForm, controls that you add will use that same font. Controls that are already on the UserForm are not affected.


Viewing the UserForm Code window

Every UserForm object has a Code module that holds the VBA code (the event-handler procedures) executed when the user works with the dialog box. To view the Code module, press F7. The Code window is empty until you add some procedures. Press Shift+F7 to return to the dialog box.

Here’s another way to switch between the Code window and the UserForm display: Use the View Code and View Object buttons in the Project window’s title bar. Or right-click the UserForm and choose View Code. If you’re viewing code, double-click the UserForm name in the Project window to return to the UserForm.


Showing the UserForm

You display a UserForm by using the UserForm’s Show method in a VBA procedure.

The macro that displays the dialog box must be in a VBA module — not in the Code window for the UserForm.

The following procedure displays the dialog box named UserForm1:

VB: Showing the UserForm
Sub ShowDialogBox()
  UserForm.Show
  'Other statements can go here
End Sub

When Solidworks displays the dialog box, the ShowDialogBox macro halts until the user closes the dialog box. Then VBA executes any remaining statements in the procedure. Most of the time, you won’t have any more code in the procedure.


Using information from a UserForm

The VBE provides a name for each control you add to a UserForm. The control’s name corresponds to its Name property. Use this name to refer to a particular control in your code. For example, if you add a CheckBox control to a UserForm named UserForm1, the CheckBox control is named CheckBox1 by default. The following statement makes this control appear with a checkmark:

UserForm1.CheckBox1.Value = True

Most of the time, you write the code for a UserForm in the UserForm’s code module. If that’s the case, you can omit the UserForm object qualifier and write the statement like this:

CheckBox1.Value = True

I recommend that you change the default name the VBE has given to your controls to something more meaningful.

This will sum-up our tutorials on Visual Basic for Application. From now on I will give tutorials on how to use Solidworks commands with the help of VBA Macro.
If you want to know any explanation on any topic related to VBA, please drop a comment and I will try to give it to you. Thank you!!!!

Sunday 8 July 2018

Working with UserForms

Each dialog box that you create is stored in its own UserForm object — one dialog box per UserForm. You create and access these UserForms in the Visual Basic Editor.

Inserting a new UserForm

To insert a UserForm object with the following steps:

  1. In the macro, you can insert User form with following 2 ways:

    • From “Menu Bar” ⇨ “UserForm”
    • From “Standard Toolbar” by clicking “Insert UserForm”
    • The VBE insert a new UserForm object with an empty dialog box.

  2. If “Property window” is not available in your macro, press F4 to display “Property window”.

The VBE inserts a new UserForm object, which contains an empty dialog box.

Below figure shows a UserForm — an empty dialog box with some controls in Toolbox.

A new userform object

Adding controls to a UserForm

When you activate a UserForm, the VBE displays the Toolbox in a floating window, as shown in the above figure. You use the tools in the Toolbox to add controls to your UserForm. If the Toolbox doesn’t appear when you activate your UserForm, choose View ⇨ Toolbox.

To add a control, just click the desired control in the Toolbox and drag it into the dialog box to create the control. After you add a control, you can move and resize it by using standard techniques.

Below table indicates the various tools, as well as their capabilities. To determine which tool is which, hover your mouse pointer over the control and read the small pop-up description.

ToolBox Control
Controls What it does
Label Shows text
TextBox Determines which of the file filters the dialog box displays by default.
ComboBox Display a drop-down list.
ListBox Display a list of items.
CheckBox Useful for On/off or Yes/No options.
OptionButton Used in groups; allows the user to select one of several options.
ToggleButoon A button that is either on or off.
Frame A container for other control.
CommandButton A clickable button.
TabStrip Display Tabs
MultiPage A tabbed container for other objects.
ScrollBar A draggable bar.
SpinButton A clickable button often used for changing a value.
Image Contains an image
RefEdit Allows the user to select a range.